Showing posts with label heat embossing. Show all posts

Sunday, January 26, 2020

A BRIDE'S BOUQUET | PICKET FENCE STUDIOS | ZIG CLEAN COLOR REAL BRUSH | CREATING A SHADOW | #DJC

I played with the new A Bride's Bouquet from Picket Fence Studios today. I used my zig clean color real brush markers to "watercolor" the image.


Confused about why I named it all Delaney Jane Cards if my name is Renee’?

This entire thing, shop, YouTube channel, blog, etc, it is all named after our angel daughter who passed away in 2013. I made her some promises when she passed away. I would spread joy, I would make her proud and I would speak her name daily. This is one way we choose to honor her memory, and help me keep my promises.

You can watch me create this card and many others on my YouTube channel. Here is the link directly to this card video: https://youtu.be/vdMl_I-GiF8
Check out our online store at: https://www.delaneyjanecards.com
 Want to visit us on Instagram?
Check us out at @delaneyjanecards
Facebook: https://www.facebook.com/delaneyjanecards/
 Email: delaneyjanecards@gmail.com


Products Used (May contain affiliate links. Affiliate links add nothing to the cost of your product but I do make a small portion of the sale. This helps support my channel so I can continue to bring you free quality content) All items were purchased with my own funds excluding the items with an asterick*.


Picket Fence: A bride's bouquet: https://www.not2shabbyshop.com/A-Bride%E2%80%99s-Bouquet_p_9935.html?/Affid=14 (Not 2 Shabby Shop)
Zig Clean Color Real Brush Markers: https://shareasale.com/m-pr.cfm?merchantid=30103&userid=2258142&productid=507850326&afftrack= (Dick Blick)
Spectrum Noir Clear Glitter Overlay Pen: https://butterflyreflectionsink.3dcartstores.com/Spectrum-Noir-Sparkle-Pen--Clear-Overlay_p_6162.html (butterfly reflections ink)

Saturday, November 9, 2019

Festive Trees - Christmas Series 2019


I used the stamp set from Simon Says Stamp called Festive Trees. I may have stated it was a Stamptember 2018 release but I don't think it was.


I used the very graphic trees made with triangles on these cards as well as the festive Season's Greetings sentiment.

Pulling out a tried and true technique of emboss resist with watercolor, these cards turned out to be bright and cheery with a touch of gold sparkle to them. I used my Ganzi Tambi water color set and some real quick painting to create this set of 6.


To watch me create this set of 6 Christmas Cards, visit my YouTube channel here: Delaney Jane Cards


Thank you for stopping by & remember to GIVE CARDS GENEROUSLY!
-Renee'

All items were purchased with my own funds. This video / blog is not sponsored.

Confused about why I named it all Delaney Jane Cards if my name is Renee’?
This entire thing, shop, YouTube channel, blog, etc, it is all named after our angel daughter who passed away in 2013. I made her some promises when she passed away. I would spread joy, I would make her proud and I would speak her name daily. This is one way we choose to honor her memory, and help me keep my promises.


Check out our online store at: www.delaneyjanecards.com
Want to visit us on Instagram? Check us out at @delaneyjanecards


Wednesday, October 2, 2019

Layering Embossing Powder And Adding Shimmer

I pulled out some older sets from my stamp collection today and used these large Fiskars sets. The background stamp is from Henna Petals and the sentiment is from Friends Forever Quotes. Both have been a part of my stamp collection for several years.


I layer heat embossing today as one of my techniques making this card. I heat embossed a sentiment over a heat embossed background. A very cool technique that will leave people wondering how you did that.

Also, today I my voice over was visited by my current favorite 2 year old...  I didn't redo my voice over because I'm not sure I'll find the quite time to retry. So enjoy a little from Ryker along the way. ;)

You can listen for my special guest and watch this card come together here: Delaney Jane Cards

All items were purchased with my own funds. This video / blog is not sponsored.

Confused about why I named it all Delaney Jane Cards if my name is Renee’?
This entire thing, shop, YouTube channel, blog, etc, it is all named after our angel daughter who passed away in 2013. I made her some promises when she passed away. I would spread joy, I would make her proud and I would speak her name daily. This is one way we choose to honor her memory, and help me keep my promises.

Speaking of blog, you can check it out at : www.delaneyjanecards.blogspot.com
YouTube is at:  https://www.youtube.com/channel/UCyFZ3_vCTd3EohFMlGfRODQ
Check out our online store at: www.delaneyjanecards.com
Want to visit us on Instagram? Check us out at @delaneyjanecards
Facebook: https://www.facebook.com/delaneyjanecards/
Email: delaneyjanecards@gmail.com


Friday, September 27, 2019

Solid Image Stamping and Using Stash Items

Today I made a card using an older set from my stash. It is far from the oldest, I love my stamp stash!


I want to show that you don't always have to have the newest items to create beautiful card. This card was created entirely with stash items that have been in my stash at least a year, some items are five or more years old. (the newest item was an embossing folder, new to me, not sure how long it has been on the market)


I used this beautiful patterned paper to base my colored stamping on. Though my stamped images were bolder, I think it still worked well together.

I used some pearls that I've had for years, some "sample" size ink pads and some really well versed techniques to make this card. Clear embossing powder over colored ink, ribbon and twine, coloring embellishments to coordinate, edging with inks... this card has so much put into the details but I didn't need to own anything new to do it.


To watch this card be made on YouTube, you can click here: Delaney Jane Cards


All items were purchased with my own funds. This video / blog is not sponsored.

Confused about why I named it all Delaney Jane Cards if my name is Renee’?
This entire thing, shop, YouTube channel, blog, etc, it is all named after our angel daughter who passed away in 2013. I made her some promises when she passed away. I would spread joy, I would make her proud and I would speak her name daily. This is one way we choose to honor her memory, and help me keep my promises.

Speaking of blog, you can check it out at : www.delaneyjanecards.blogspot.com
Check out our online store at: www.delaneyjanecards.com
Want to visit us on Instagram? Check us out at @delaneyjanecards


Friday, September 13, 2019

Creating a Non-Traditional Sky with Heffy Doodle Rescue Dog


I created a tone on tone non-traditional sky background for this super adorable dog from the Heffy Doodle Rescue Dog stamp set. I heat embossed and stenciled my way to a finished card.


You can watch this card be made here: Creating a Non-Traditional Sky with Heffy Doodle Rescue Dog


All items were purchased with my own funds. This video / blog is not sponsored.

Confused about why I named it all Delaney Jane Cards if my name is Renee’?
This entire thing, shop, YouTube channel, blog, etc, it is all named after our angel daughter who passed away in 2013. I made her some promises when she passed away. I would spread joy, I would make her proud and I would speak her name daily. This is one way we choose to honor her memory, and help me keep my promises.

Speaking of blog, you can check it out at : www.delaneyjanecards.blogspot.com
YouTube is at:  https://www.youtube.com/channel/UCyFZ3_vCTd3EohFMlGfRODQ
Check out our online store at: www.delaneyjanecards.com
Want to visit us on Instagram? Check us out at @delaneyjanecards
Facebook: https://www.facebook.com/delaneyjanecards/
Email: delaneyjanecards@gmail.com

Tuesday, September 10, 2019

Creating With Only Sentiments


I used Pink & Main's new stamp set titled Going Places to create a card using only sentiments. I feature a very neat die cutting technique to add interest to a simple card as well as ink blending and heat embossing. All great techniques for the new crafter and the advanced crafter alike.

You can watch the video here: Creating with only Sentiments

All items were purchased with my own funds. This video / blog is not sponsored.

Confused about why I named it all Delaney Jane Cards if my name is Renee’?
This entire thing, shop, YouTube channel, blog, etc, it is all named after our angel daughter who passed away in 2013. I made her some promises when she passed away. I would spread joy, I would make her proud and I would speak her name daily. This is one way we choose to honor her memory, and help me keep my promises.

Speaking of blog, you can check it out at : www.delaneyjanecards.blogspot.com
YouTube is at:  https://www.youtube.com/channel/UCyFZ3_vCTd3EohFMlGfRODQ
Check out our online store at: www.delaneyjanecards.com
Want to visit us on Instagram? Check us out at @delaneyjanecards
Facebook: https://www.facebook.com/delaneyjanecards/
Email: delaneyjanecards@gmail.com

Friday, September 6, 2019

Glow in the Dark Night Scene with Heffy Doodle's Rescue Dog

Hi Crafty Friends!

Today, I created a night scene card with glow in the dark accents and the most adorable super dog ever!


I used Heffy Doodle's Rescue Dog stamp set and an MFT die with for the city silhouette and a Mama Elephant die for the frame.

This super simple card features an ink blended night sky with water drop details, nuvo glitter starts and nuvo glow drop details!

I copic colored the super dog and fussy cut him out so he wouldn't have a white border. I thought that would be jarring against the night sky.

Here is the process video on my channel if you'd like to watch this card come together. Delaney Jane Cards YouTube


All items were purchased with my own funds. This video / blog is not sponsored.

Confused about why I named it all Delaney Jane Cards if my name is Renee’?
This entire thing, shop, YouTube channel, blog, etc, it is all named after our angel daughter who passed away in 2013. I made her some promises when she passed away. I would spread joy, I would make her proud and I would speak her name daily. This is one way we choose to honor her memory, and help me keep my promises.

Speaking of blog, you can check it out at : www.delaneyjanecards.blogspot.com
Check out our online store at: www.delaneyjanecards.com
Want to visit us on Instagram? Check us out at @delaneyjanecards


Saturday, June 29, 2019

Life begins after coffee

I went into the craft room today to make a birthday card for a young man, a 30 year old man and this isn't a card for a young man. Sometimes creativity just takes over and decides what is going to be made and today that is exactly what happened.

I pulled out some of my older stamps. The coffee set is a Clearly Besotted set I've had at least 5 years. The bird is a stamp I've had even longer. A friend of mine and I went to a rubber stamp show about 7 or 8 years ago and we each purchased a grab bag of unmounted rubber stamps from Victorine Originals. I think they have merged with Raisin Boat stamps and is now SumMore Fun stamps.

The papers in this card are from Pink and Main and came from their new release. The papers just spoke to me.


I stamped the mugs in Pink and Main inks, street light and stop sign. And I die cut them with the coordinating die.

I hand cut the edge of a piece of kraft cardstock and then ink blended distress oxide frayed burlap ink on cardstock without reinking my foam, I just used the ink remaining from the last time I used that foam. I added some white pen dot detail as well as some gold dot detail with my gel pens for a little bit of interest. Then I used a versamark pen and heat embossed the edge with WOW white puff embossing powder.


I used asphalt ink by Pink and Main for the coffee steam and the birds but I used second generation stamping to get a much lighter image. I thought it made the birds look like they were far in the distance.


I placed the cups on the weathered wood "table" and stamped the sentiment in the same Pink and Main Asphalt ink but first generation so it was very bold. I didn't want to introduce black on this card because I thought it would be too bold.

I used two Copic markers to fill the cups with coffee, E57 & E59 because you have to have coffee in the cups...

I love this scene and wish I could find this beach. I'd love to sit and watch the waves crash on the shore while drinking out of one of these adorable mugs.

Tuesday, June 18, 2019

Day 4 and some Deer


Today I made a super quick card. I die cut this deer silhouette landscape scene from some lawn fawn licorice cardstock.

I ink blended three distress oxide inks in mustard seed,  spiced marmalade, and broken china on a piece of Simon Says white cardstock.


I heat embossed the sentiment from a Simon Says stamp set in the lower right corner in white embossing powder. I layered the die cut over the ink blended panel and adhered it to a white card base. 

Today is day 4 of the 30 day coloring challenge. Did you color today?


Monday, June 17, 2019

A Shore thing and Day 3

Today, I had the opportunity to sneak a few minutes in of some crafty time. I am still working through the Pink and Main Crafty Courtyard card kit. I'm working on creating as many cards as possible with these kits to make them worth the cost because it is hard for me to justify the monthly fees for these kits if I can't make a bunch of cards with them. 


These are the three cards I'm choosing to share today. All different but all using this kit. I think being able to create entirely different feeling cards from one kit makes this one a real winner.


This seashell card was actually the last of the three that I made today. It was made up of extras. I had this panel die cut and these left over shells from the other shell card I made. The only thing I had to do was stamp and watercolor the sentiment strip and adhere everything together on a Tonic Studio honey gold panel. So pretty and delicate looking. I finished it off with some of the PnM rose gold gems. STUNNING!


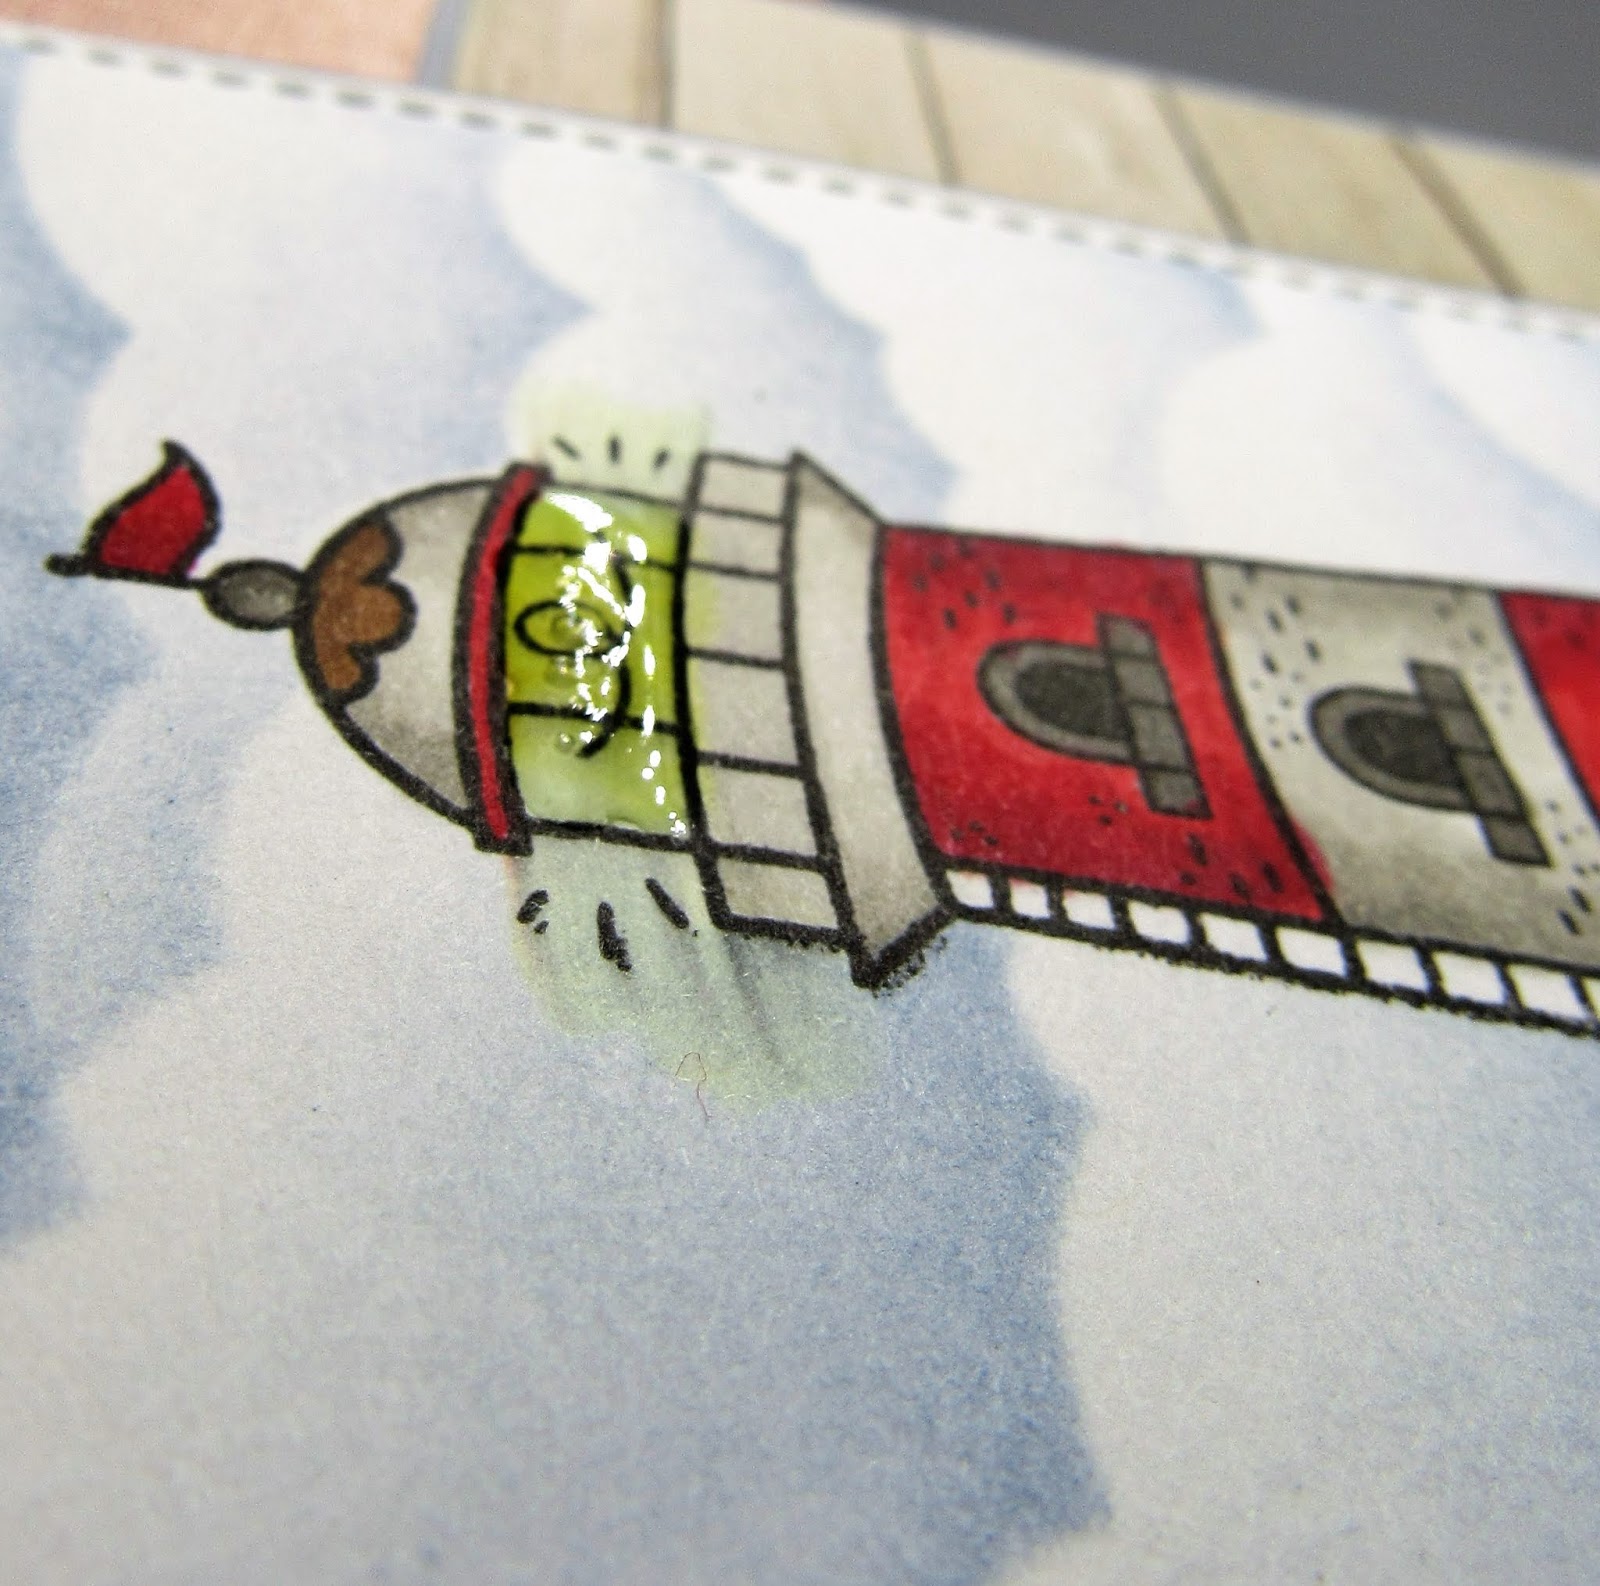
The second card features this amazing light house. I masked the stamped image and ink blended the background panel with some stormy sky distress ink and a honey bee stamps stencil. I layered everything onto some heavy weight cardstock and adhered the panels to the card base. I cut my sentiment stamp (GASP!) so it fit on the wooden planks of the patterned paper, tied a piece of the brown twine to the panel and added a few knots for a nautical look.


A little glossy accents on the light of the light house finished this card. I adore the color combination of this kit and this card.


The final card for the day is something I never thought I'd create. I dry embossed the circle with the embossing folder that came in the kit, Darice's sunrays. I used some abandoned coral and squeezed lemonade distress ink. I masked off the circle with a piece of post it tape I cut a freehand wave pattern from and ink blended the water, broken china and chipped sapphire distress oxide.

I masked off the water and inked up the sand with antique linen distress oxide. I added some water splatters to the image and let them sit and picked the water up with  my towel. And I mounted the circle to a deep gray/ blue cardstock. I heat embossed the sentiment on the water in the little scene with white embossing powder.

I heat embossed the shells with gold embossing powder and water colored with zig clear color markers in pink flamingo and tea rose and blended the color out with the blender pen. I layered these shells on the edge of the circle.

I finished this card off with some spectrum noir sparkle pen, flat back gems, a gold Love from Lizi peel-off and some pattern papers from the paper pad. I popped the circle and shells up on foam mounting tape and tucked those gems in to add more sparkle.


Today was day three of the 30 day coloring challenge by the daily marker.


Friday, April 14, 2017

Faith


With Easter approaching and with most Christians celebrating Good Friday today, I thought a few Easter cards would be appropriate. I started out with this blue version of this card and it morphed into the pink-purple version. Let me explain what happened and how I love them both.


I started with two pieces of Strathmore ready cut watercolor paper and my Ganzi Tambi Watercolor pallet. I put a wash of blue on one piece and a wash of pink with a touch of purple on the other and allowed them to dry.

While those were drying I stamped the Cross image on some Smooth white card stock from MFT in Lawn Fawn Jet Black ink. I colored one using my Copic markers and the other using my Prisma Color pencils. I fussy cut the images and set them aside.

I heat embossed the MFT flourish background stamp in clear on the pink-purple piece and stenciled the SSS morrocan stencil over the blue in stormy sky distress ink, then die cut the panels as well as two additional from MFT's Blueberry cardstock using the Park Ave frame by Mama Elephant.  I also die cut the SSS Painted Faith die 6 times, 3 black and 3 from MFT blueberry cardstock.

The first card went together just as I had envisioned, stacked the frames on top of each other, adhered the center panel directly to the card base. I stacked the blue die cuts on top of each other, stamped the cross and paper pieced the colored image onto the center panel and adhered the Faith die cut over the top. Three SU enamel dots around the cross and some Spectrum Noir Clear Glitter Overlay pen on the sentiment finished it up.

I really like the subtle dimension created by stacking the dies.


I finished the inside of the card with a sentiment and re-stamped the focal image in the stormy sky ink.


For the second card I used the same three main pieces, the Park Ave frame, the same sentiment and the same focal image. Look how different this turned out.


Instead of stacking dies for the frame, I mounted it on two layers of foam tape. Instead of layering the sentiment over the cross image, I used the cross to replace the t in faith. I added a layer of clear glitter overlay pen and a generous layer of glossy accents to the die cut and cross. A scattering of Pretty Pink Posh Sparkling Clear Sequins and some drying time and this card was complete.


I finished the inside the same as the first but used spun sugar distress ink for the cross.


These were fun to create and it was a challenge to use these same pieces two ways.

Thanks for stopping by!

Wednesday, April 5, 2017

Hey Cancer

I decided to give it my best shot at a blog schedule because I realize I miss blogging and sharing my cards and projects. I also miss having a reason to really craft on a regular basis, excluding what I've already committed to (cancer cards, orders, craft fairs and personal use cards). I figured, why not give it a try.  So today I offer this Hey Cancer card.


All the stamps used are from Unity Stamp Company. I heat embossed the heart with the cancer ribbon in clear on a Strathmore Bristol Smooth Cardstock then ink blended distress inks over to reveal the emboss resist pattern. I love how these inks move and blend on this cardstock. They also seem to be softer than on other cardstocks too.


A sentiment heat embossed on some black card stock and cut into a banner with a Simon Says Stamp die popped up on foam tape and a few Pretty Pink Posh Sparkling clear sequins finish this card.


Monday, April 3, 2017

You are Amazing

This Sketched Ranunculus set by Simon Says Stamp is a favorite of many YouTubers and their videos had me running to the site to purchase it. I have used it a few times but I wanted to channel one of my favorite YouTubers and create an Amy Rysavy-esque card.


Amy is particularly fond of the messy watercolor technique with this set and I thought I'd give it a try. It is completely outside my comfort zone because I'm a stay inside the lines kind of a crafter.   I stamped the images multiple times on this panel of Strathmore Bristol Smooth cardstock. I somewhat masked a few things but I didn't really take my time to do that. I was going for a messy free flowing panel. 

I used my Zig clean color markers to put a little color on the images and used a water brush to pull the color out and blend it. I know I have a lot of work to do to be comfortable and create a true messy watercolor look, but I tried. 

I did the background in a light blue and because I didn't heat emboss the images, I stamped them in versafine, the colors bled out but lent themselves to that messy look.  The panel is die cut with a Simon Says Stamp Stitched Rectangle die and layered on black card stock.

I heat embossed a sentiment from this set on a piece of black cardstock and die cut it with a Simon Says Stamp banner die and popped it up with foam tape. 

A few Pretty Pink Posh Sparkling clear sequins finished this card off. 


I'd love to hear if you've mastered this technique of messy watercoloring and if so, what should I do to help myself along with this.