Showing posts with label Sequins. Show all posts

Tuesday, September 10, 2019

Creating With Only Sentiments


I used Pink & Main's new stamp set titled Going Places to create a card using only sentiments. I feature a very neat die cutting technique to add interest to a simple card as well as ink blending and heat embossing. All great techniques for the new crafter and the advanced crafter alike.

You can watch the video here: Creating with only Sentiments

All items were purchased with my own funds. This video / blog is not sponsored.

Confused about why I named it all Delaney Jane Cards if my name is Renee’?
This entire thing, shop, YouTube channel, blog, etc, it is all named after our angel daughter who passed away in 2013. I made her some promises when she passed away. I would spread joy, I would make her proud and I would speak her name daily. This is one way we choose to honor her memory, and help me keep my promises.

Speaking of blog, you can check it out at : www.delaneyjanecards.blogspot.com
YouTube is at:  https://www.youtube.com/channel/UCyFZ3_vCTd3EohFMlGfRODQ
Check out our online store at: www.delaneyjanecards.com
Want to visit us on Instagram? Check us out at @delaneyjanecards
Facebook: https://www.facebook.com/delaneyjanecards/
Email: delaneyjanecards@gmail.com

Wednesday, April 19, 2017

You've Captured My Heart

I love personalizing thank you cards, don't you? I have this wonderful, beautiful, talented friend who came to my house and took photos of our newborn, Ryker Gregory.


I mean, look at these, she is a new photographer and this is just a little sampling of the beautiful photos she took.


Look at these baby feet!


She even captured a little smile on this one and in the background is a teddy bear that has Delaney's hair in it. The bear was a gift from the funeral director when we buried her.

Anyway, back to the card. I needed to create a card that said thank you but I wanted it to be very personalized and I reached for a Unity Stamp called Captured My Heart by Lisa Arana.


There is really only a single stamped image used in this card, the camera. Otherwise it is completely created with die cuts, something I really don't do that often. The camera was just perfect with these patterned papers and I colored it to match. I used some Spectrum Noir Clear Sparkle Overlay Pen to cover the camera and then a little glossy accents on the lens. I added a few sequins, layered all the die cut panels and voila, a beautiful thank you card for a beautiful photographer and friend.

You can see the dimension in the image below.


I can't wait to send this to my friend.

Friday, April 14, 2017

Faith


With Easter approaching and with most Christians celebrating Good Friday today, I thought a few Easter cards would be appropriate. I started out with this blue version of this card and it morphed into the pink-purple version. Let me explain what happened and how I love them both.


I started with two pieces of Strathmore ready cut watercolor paper and my Ganzi Tambi Watercolor pallet. I put a wash of blue on one piece and a wash of pink with a touch of purple on the other and allowed them to dry.

While those were drying I stamped the Cross image on some Smooth white card stock from MFT in Lawn Fawn Jet Black ink. I colored one using my Copic markers and the other using my Prisma Color pencils. I fussy cut the images and set them aside.

I heat embossed the MFT flourish background stamp in clear on the pink-purple piece and stenciled the SSS morrocan stencil over the blue in stormy sky distress ink, then die cut the panels as well as two additional from MFT's Blueberry cardstock using the Park Ave frame by Mama Elephant.  I also die cut the SSS Painted Faith die 6 times, 3 black and 3 from MFT blueberry cardstock.

The first card went together just as I had envisioned, stacked the frames on top of each other, adhered the center panel directly to the card base. I stacked the blue die cuts on top of each other, stamped the cross and paper pieced the colored image onto the center panel and adhered the Faith die cut over the top. Three SU enamel dots around the cross and some Spectrum Noir Clear Glitter Overlay pen on the sentiment finished it up.

I really like the subtle dimension created by stacking the dies.


I finished the inside of the card with a sentiment and re-stamped the focal image in the stormy sky ink.


For the second card I used the same three main pieces, the Park Ave frame, the same sentiment and the same focal image. Look how different this turned out.


Instead of stacking dies for the frame, I mounted it on two layers of foam tape. Instead of layering the sentiment over the cross image, I used the cross to replace the t in faith. I added a layer of clear glitter overlay pen and a generous layer of glossy accents to the die cut and cross. A scattering of Pretty Pink Posh Sparkling Clear Sequins and some drying time and this card was complete.


I finished the inside the same as the first but used spun sugar distress ink for the cross.


These were fun to create and it was a challenge to use these same pieces two ways.

Thanks for stopping by!

Wednesday, April 5, 2017

Hey Cancer

I decided to give it my best shot at a blog schedule because I realize I miss blogging and sharing my cards and projects. I also miss having a reason to really craft on a regular basis, excluding what I've already committed to (cancer cards, orders, craft fairs and personal use cards). I figured, why not give it a try.  So today I offer this Hey Cancer card.


All the stamps used are from Unity Stamp Company. I heat embossed the heart with the cancer ribbon in clear on a Strathmore Bristol Smooth Cardstock then ink blended distress inks over to reveal the emboss resist pattern. I love how these inks move and blend on this cardstock. They also seem to be softer than on other cardstocks too.


A sentiment heat embossed on some black card stock and cut into a banner with a Simon Says Stamp die popped up on foam tape and a few Pretty Pink Posh Sparkling clear sequins finish this card.


Monday, April 3, 2017

You are Amazing

This Sketched Ranunculus set by Simon Says Stamp is a favorite of many YouTubers and their videos had me running to the site to purchase it. I have used it a few times but I wanted to channel one of my favorite YouTubers and create an Amy Rysavy-esque card.


Amy is particularly fond of the messy watercolor technique with this set and I thought I'd give it a try. It is completely outside my comfort zone because I'm a stay inside the lines kind of a crafter.   I stamped the images multiple times on this panel of Strathmore Bristol Smooth cardstock. I somewhat masked a few things but I didn't really take my time to do that. I was going for a messy free flowing panel. 

I used my Zig clean color markers to put a little color on the images and used a water brush to pull the color out and blend it. I know I have a lot of work to do to be comfortable and create a true messy watercolor look, but I tried. 

I did the background in a light blue and because I didn't heat emboss the images, I stamped them in versafine, the colors bled out but lent themselves to that messy look.  The panel is die cut with a Simon Says Stamp Stitched Rectangle die and layered on black card stock.

I heat embossed a sentiment from this set on a piece of black cardstock and die cut it with a Simon Says Stamp banner die and popped it up with foam tape. 

A few Pretty Pink Posh Sparkling clear sequins finished this card off. 


I'd love to hear if you've mastered this technique of messy watercoloring and if so, what should I do to help myself along with this.

Monday, March 27, 2017

Unicorns & Rainbows: Growing in Unity Day 1


Hi Everyone, 

My name is Renee and I am one of the Growing in Unity girls for the week. I've been paper crafting for almost 20 years (I just gasped at that too). I started out with scrapbooks when I was pregnant with my oldest son, now almost 19 and have since switched almost exclusively to card making. I love the instant gratification cards bring. 

As I said, I started nearly 20 years ago while pregnant with my first son and just a few short weeks ago my husband and I welcomed collective baby number 7! We are a big blended family and our kids range from almost 19 to 5 weeks old. 

We endured a tragedy in 2013 when our 10 day old daughter Delaney passed away. Since then it has been my sole mission to spread joy and happiness. Although she did not pass away from cancer, I felt the people battling cancer were feeling the same helpless feelings my husband and I were while we watched our daughter struggle and fight. So, I've been sending cards of hope to cancer patients for the last 3 1/2 years, mostly anonymously, always full of love and hope. Unity has been a huge part of this because they carry such an amazing line of cancer stamps (so grateful for that, btw). 

This week I want to focus on techniques and bright fun cards. I hope you enjoy my cards as much as I do. Today's technique is INK SMOOSHING. By pressing the distress ink pads down on a piece of acetate and spritzing the pigment with water and dabbing your paper into the ink pool, you can create some really interesting and beautiful designs, images and backgrounds. 

My first card this week required me to step outside my crafty comfort zone, completely. I'm not usually a fan of ink smooshing because it delivers results that are less than ... controlled... and I'm a pretty clean and simple card maker. The background on this card is rainbow ink smooshing, what else would you think would be appropriate for this super cute Unicorn by Susan Weckesser?


This set is called Unicorns & Rainbows and comes with 6 red rubber stamps. I used three image stamps and the sentiment to create this card.


I paper pieced the cute unicorn and cloud onto the background, colored the rainbow with some fun copic markers and added some sparkle to the unicorn. How much fun is this card!


Be sure to leave a comment below for your change to win some fun stamps from Unity Stamp Company!


The products used to create this bright and cheery card are:

Unity Stamp Co Unicorns & Rainbows available here:
Unicorns & Rainbows

Ranger Distress Inks:
Candied Apple
Carved Pumpkin
Mustard Seed
Lucky Clover
Blueprint Sketch
Wilted Violet

Additional Products Used:
A Muse Studio Landscape die- cloud border
Mama Elephant Die- Park Ave. Frame
Copic Markers- Rainbow colors
PPP sequins
Tim Holtz water color paper
Spectrum noir sparkle overlay pen

Thursday, February 4, 2016

Day 4 of the 30 Day Coloring Challenge


 Day 4 of the 30 Day Coloring Challenge from the daily marker. #thedailymarker30day


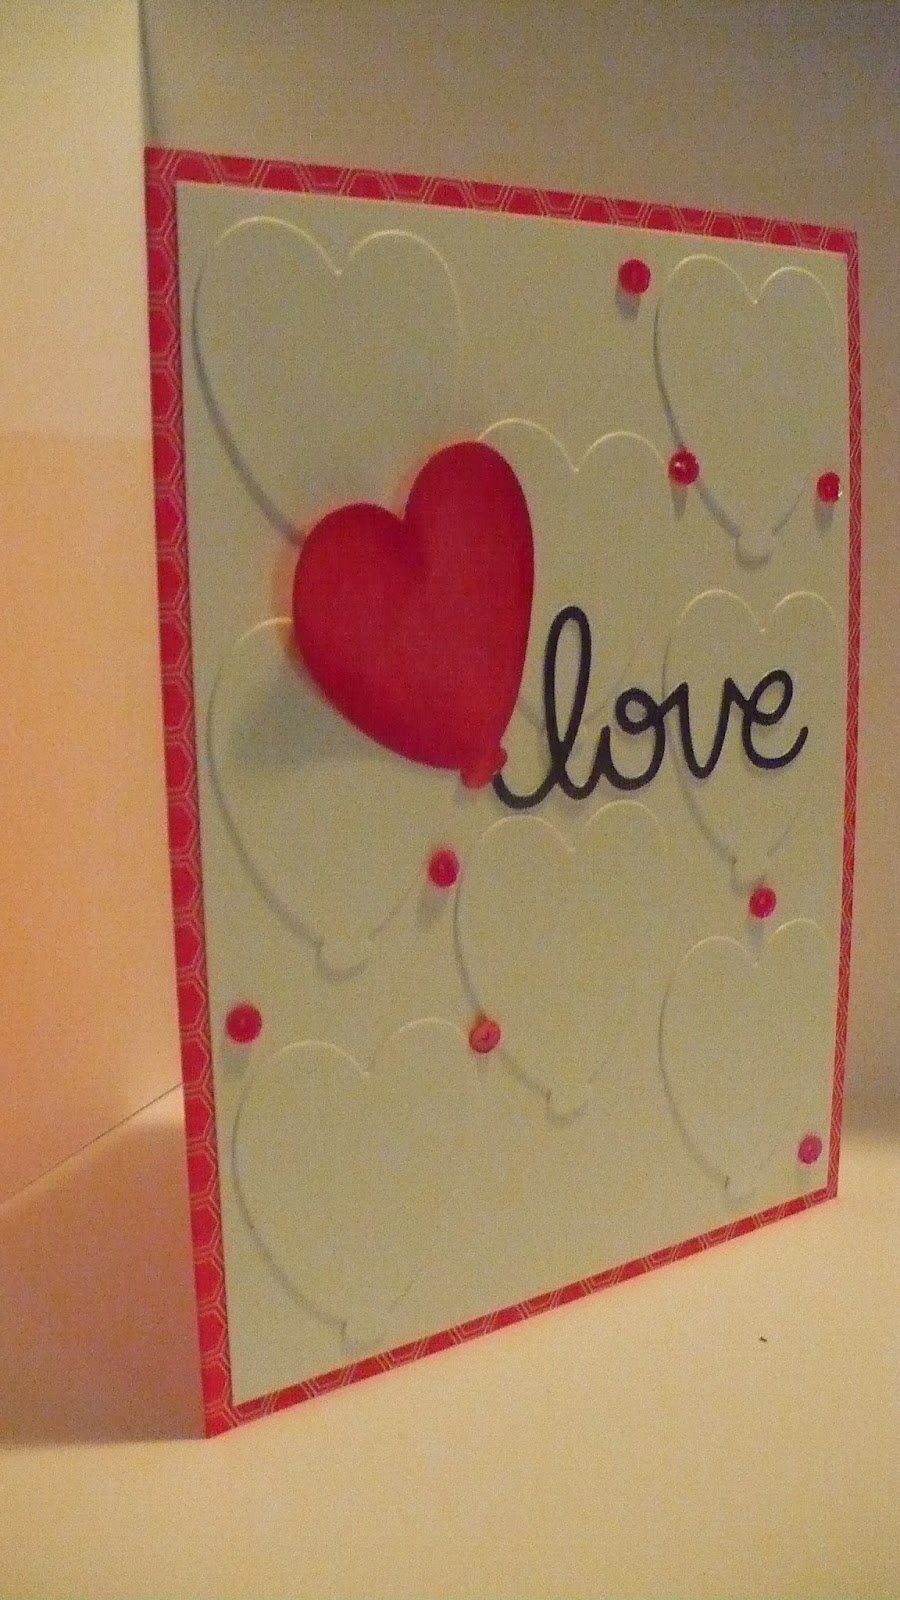
I colored the one heart with my Copic Markers R24, R27, R29.


I die cut the heart balloons from sugar card stock and layered them onto a sugar piece of card stock. This gives an embossed look. Then die cut the love from onyx card stock. I popped up the balloon only on the top with 3d foam adhesive but used Tombo Mono Multi Adhesive to adhere the tie of the balloon down.The word represents the string of the balloon. I added a few cherry sequins for sparkle.


A Muse Products Used

Sugar Card Stock
Onyx Card Stock
Apple Petite Hexagon Card Stock
These can be purchased here: A Muse Card Stock

Cherry Sequins
These can be purchased here: A Muse Sequins

Copic Markers R24, R27, R29
These can be purchased here: A Muse Studio Copic Markers

Tombo Mono Multi
Sakura Quickie Glue Pen
These can be purchased here: A Muse Studio Adhesive & Tools


Tuesday, February 2, 2016

Day 2 of the 30 Day Coloring Challenge


Day 2 of the 30 Day Coloring Challenge

I chose to make a card with my image, but you can play along by just coloring something, no need to make a card! Be sure to use #dailymarker30day in your post, blog, Instagram, Facebook, etc...


I had about 15 minutes to play between mommy duties today so I created this quick card.


I colored this A Muse Studio Image with Copic Markers.


Close up so you can see the coloring.


This image shows the embossed background fairly well and it also shows that the sequins match better than the other images show. In real life the match to the dress is pretty spot on.


Products used to make this card

A Muse Studio
Stamp set: Girlfriends
Die:tag bundle, hi
Embellishments: Twine, Sequins
Card stock: Onyx black, Kraft
Adhesive: Quickie Glue Pen

Lawn Fawn
Card stock: Let's Polka in the Dark

My Favorite Things
Ink: Black Licorice Hybrid Ink

Ranger
Adhesive: Multi Medium Matte

3M
Adhesive: Foam Tape

Spellbinders
Die: Large Oval
Embossing: Pebbles Impressabilities

Copic Markers
E31
E35
E51
E53
E93
V12
V15
B000
0


Monday, February 1, 2016

Day 1 of the 30 Day Coloring Challenge


Day 1 of the 30 Day Coloring Challenge, a Freshly Made sketch and a Unity Image!

I decided to push myself to participate in the 30 day coloring challenge put on by the The Daily Marker  #thedailymarker30day. The challenge isn't so much to make a card every single day as it is to color something every single day for 30 days. 

I also wanted to join in the Freshly Made Sketch #221  FMS221 as seen here Link to Freshly Made Sketch #221


Fairly simple right?


  A fairly simple card, but I took my time with the coloring. I wanted to really give rain texture to the rain. 

It is hard to see, but notice the texture below the umbrella. That was created with the 0 Copic Marker.


 Products Used

Paper
MME Stella & Rose-Mabel 
A Muse Studio Sugar Card stock
A Muse Studio Onyx Black Card stock

Ink
Versafine Onyx Black 

Copic Markers
E51
E53
E93
E37
BG13
BG15
BG18
B21
B23
B41
B45
YR14
YR16
YR18
Y11
0

Stamps
Unity ... Brighten my day

Embellishments
A Muse Studio sequin mix

Additional Tools Used
A Muse Studio Tag bundle die set
Ranger Multi Medium Matte
3M Foam Adhesive