Showing posts with label zig clean color. Show all posts

Sunday, May 31, 2020

Creating an Interactive Tea Cup Card | Bilingual

Hi Everyone! Today I'm sharing a bilingual interactive tea themed card using CAS-ual Friday's stamp and die set


I used CAS-ual Friday's set called Serendipi-tea. ← not an affiliate link
My friend Cindy sent me this teapot and cups already stamped and die cut on mixed media paper. I used my Zig Clean Color Real Brush Markers to color them. They worked really well on that paper. I was surprised. I would recommend the blender pen to use with them but I cannot find it in stock. Here is a quick link to the markers if you decide you want to try them out Zig Clean Color Real Brush Markers 48 ct 
↑ affiliate link

image shows the Cas-ual friday's stamp set with tea images and coordianting sentiments
 I paired it with this Lawn Fawn set called Spanish Scripty Sayings


From Scrapbook.com  
↑ affiliate link
Click here ↓ 
From Not2ShabbyShop.com Use Code N2S10 for 10% off

And this fantastic die set from Sunny Studio called Sliding Window
                                                                                   ↑ affiliate link


I also used a stencil from A Colorful Life Designs. My friend Nancy is on their design team and you can find her here ---> Handi Scandi's Crafty Ventures  or her Instagram  Handi Scandi (P.s. I'm sure she has a discount code too! Just poke around a bit on her FB page or IG to find it. )


Here is the stencil I used by A Colorful Life Designs, it is called Itty Bitty Love


I used ScraPerfect's Best Glue Ever™ and their tiny taller jars of embellishments to embellish this adorable card. *both links are affiliate codes


*Products Links
These links may be Affiliate links. Affiliate links provide me with a small commission at no cost to you. This helps me to continue to provide free content for you.

Want to Connect
Email: Delaneyjanecards@gmail.com
Instagram: http://www.instagram.com/delaneyjanecards/
Pinterest: http://www.pinterest.com/delaneyjanecards/
Facebook: http://www.facebook.com/delaneyjanecards
YouTube:https://www.youtube.com/c/delaneyjanecards

Saturday, January 11, 2020

MISS INK OH NUTS | NO LINE COLORING | ZIG CLEAN COLOR MARKERS | USING CHRISTMAS PAPER FOR LOVE CARDS

Today is my first post for the Not 2 Shabby Shop as a design team member. This is Huge for me. I've been really hoping to build on my skills as a paper crafter, blogger and content creator for YouTube in 2020 and I have so much opportunity before me. As 2020 starts for me here at Delaney Jane Cards, there is so much possibility before me and it starts with this post!


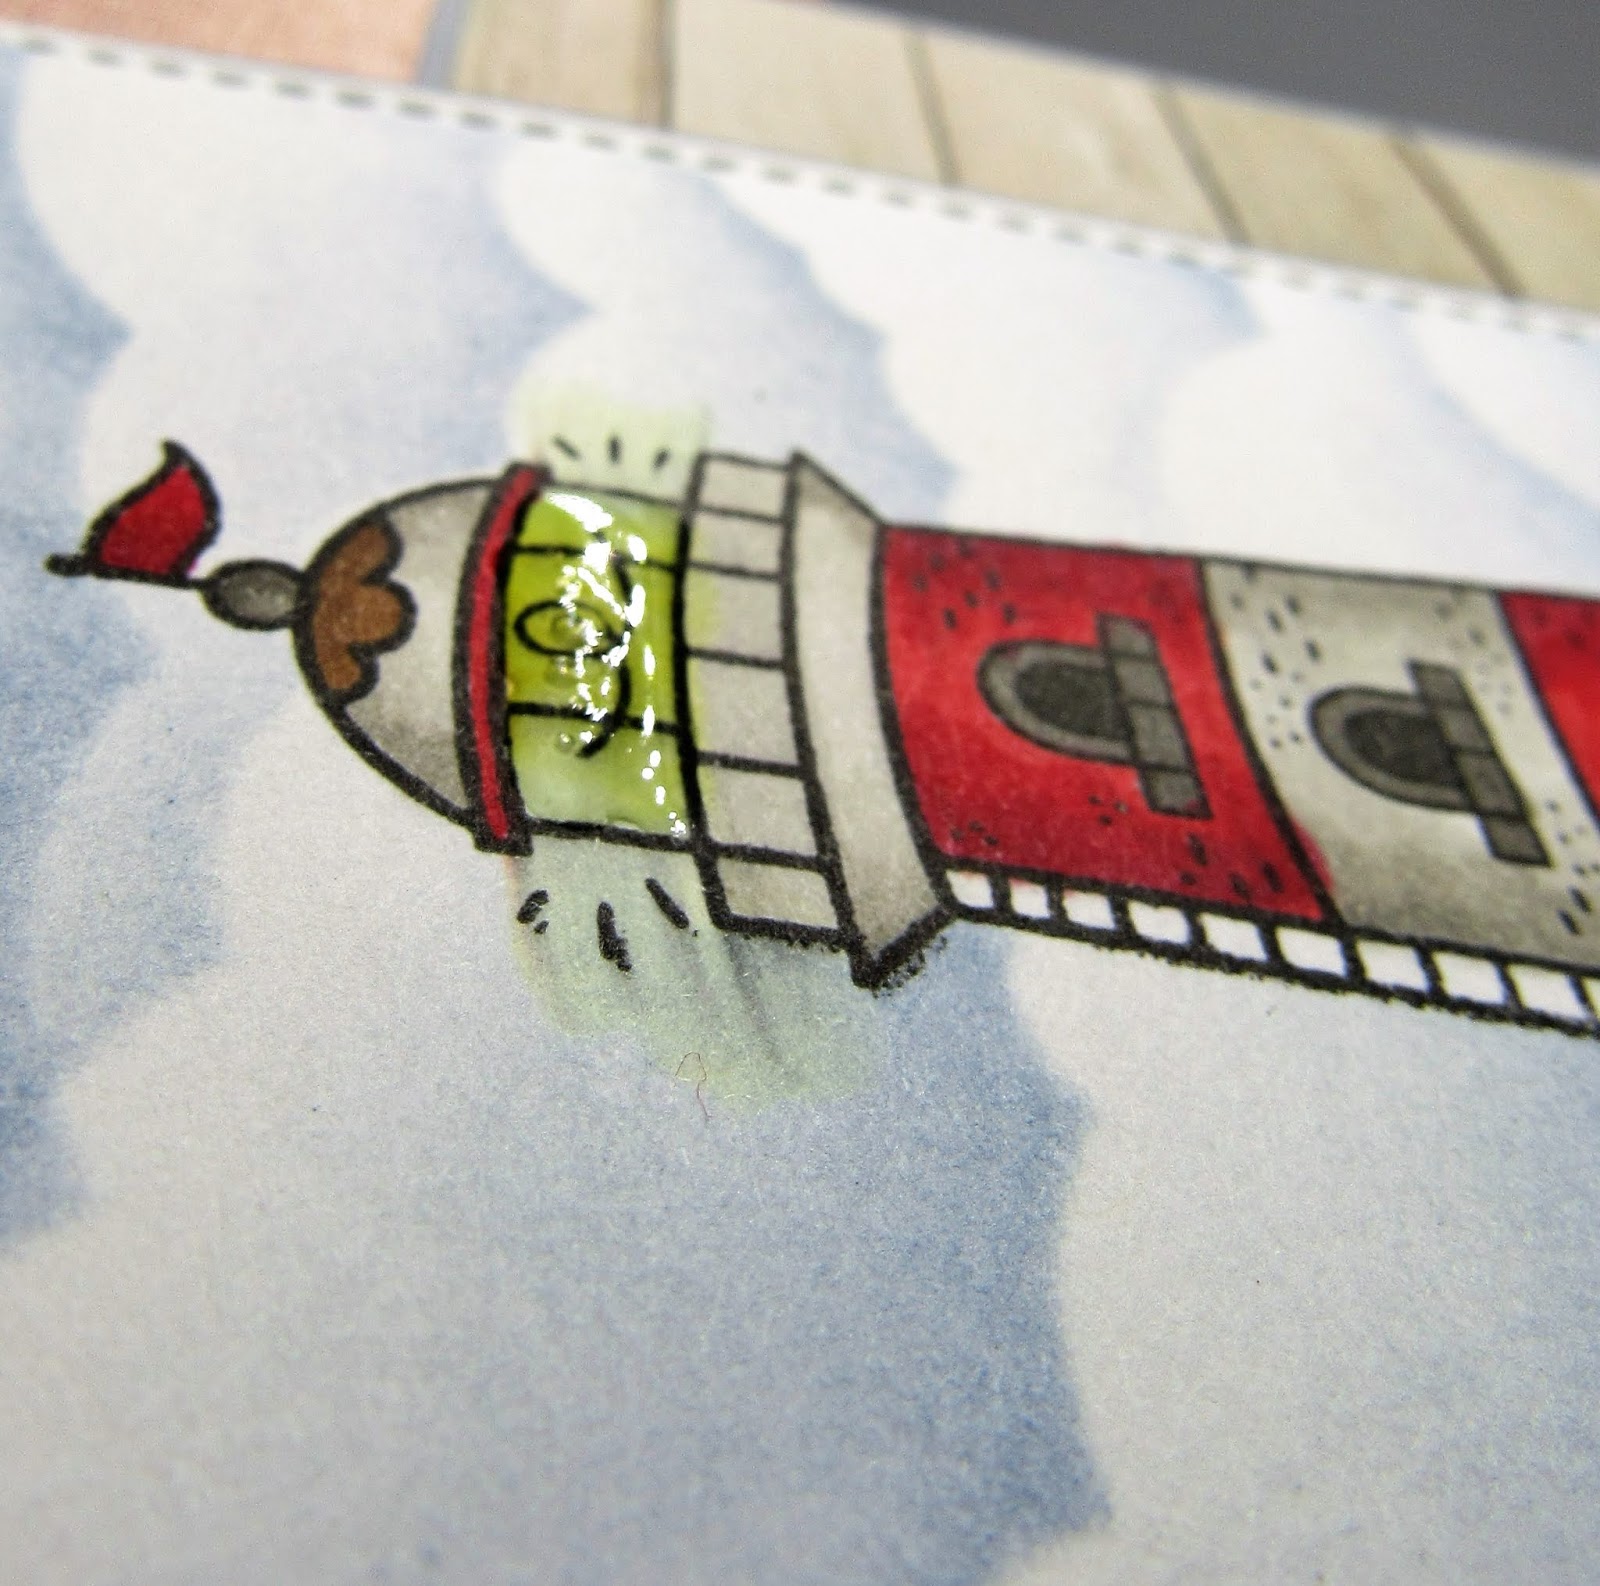
Today I got to play with a Miss Ink stamp set called Oh, Nuts. I didn't have a single Miss Ink item in my stamp inventory before a few weeks ago. So before I get into the post about my project I'd like to discuss the brand a little bit.

The stamps stamped clearly and cleanly directly from the package, I didn't have to condition them or stamp them off first before I got a clear image. I can't say that will always be the case with their stamps but as a first impression, it was really nice. It took a step out of my process and I got to move straight onto creating.

The stamp set I chose to create with this month is a fall themed set. I wanted to show that a seasonally themed stamp set can be used for other occasions with just a little creativity.

Ok, so onto the card because I know that is what you are here for. ;)


I pulled a piece of paper from the Pebbles Merry Little Christmas 6x6 paper pad. I know it is past Christmas, but this adorable heart print screams Valentine's day, does it not!


I stamped my images in Ink on 3's No-line fade out ink. I'm really new to the no line coloring experience and absolutely need more practice but why not start practicing today!


I colored my image in using my Zig Clean Color Real Brush Markers and a blending marker from Zig. I really like that they offer this because I don't always want to use water when I use these markers.


I finished this all off with some layered die cuts with edge details, white gel pen dots and some black glaze pen for the eyes to make them really stand out.

There is a coordinating video on my YouTube channel where you can watch this card come together. You can view it here: Delaney Jane Cards

 You can visit the Not 2 Shabby Shop and see what Jamie has to offer here: https://www.not2shabbyshop.com/?Affid=14

Products Used (May contain affiliate links. Affiliate links add nothing to the cost of your product but I do make a small portion of the sale. This helps support my channel so I can continue to bring you free quality content) 
 
Miss Ink: Oh Nuts* https://www.not2shabbyshop.com/Oh-Nuts_p_9211.html/?Affid=14 (Not2Shabby) 
Ink on 3 blackout ink https://www.not2shabbyshop.com/Blackout-Hybrid-Detail-Ink_p_8417.html/?Affid=14 (Not2Shabby) 
Mini misti https://amzn.to/36TvONK (Amazon) 
Sakura Gelly Roll Classic Pen Bold 10 White https://amzn.to/2Mjlc2T (Amazon) 
Black Glaze pen https://amzn.to/393uERW (Amazon) 
Zig Clean Color Real Brush Markers www.shareasale.com/a-bookmarklet.cfm (Dick Blick) 
 
Thank you for stopping by and as always GIVE CARDS GENEROUSLY! -Renee' All items were purchased with my own funds excluding the items with an asterick. This video / blog is a design team post. Confused about why I named it all Delaney Jane Cards if my name is Renee’? This entire thing, shop, YouTube channel, blog, etc, it is all named after our angel daughter who passed away in 2013. I made her some promises when she passed away. I would spread joy, I would make her proud and I would speak her name daily. This is one way we choose to honor her memory, and help me keep my promises. 
 
YouTube is at: https://youtu.be/afUmkqVsjH8
Check out our online store at: www.delaneyjanecards.com 
Want to visit us on Instagram? Check us out at @delaneyjanecards 
Facebook: https://www.facebook.com/delaneyjanecards/ 
Email: delaneyjanecards@gmail.com

Friday, November 15, 2019

Mixing Stamp Companies featuring MayMay Made Its Gather

I mixed stamp companies today, something I really love doing. This adorable cabin stamp is from Altenew and the gorgeous church, MayMay Made It. The scale of the images aren't the same but the illustration style is similar enough that staging the images with one in the foreground and one in the background the scale seems perfect.


I used water based markers to do "faux" watercoloring here. I really enjoyed the process of making this card and I am excited to share it with you.

The sentiments in this Gather set from MayMay can be built many different ways. This was just perfect enough for this card. 


All items were purchased with my own funds. This video / blog is not sponsored.

Confused about why I named it all Delaney Jane Cards if my name is Renee’?
This entire thing, shop, YouTube channel, blog, etc, it is all named after our angel daughter who passed away in 2013. I made her some promises when she passed away. I would spread joy, I would make her proud and I would speak her name daily. This is one way we choose to honor her memory, and help me keep my promises.

This card is a star! Check it out on YouTube here: https://youtu.be/ieoW51rdsX4

Check out our online store at: www.delaneyjanecards.com
Want to visit us on Instagram? Check us out at @delaneyjanecards
Facebook: https://www.facebook.com/delaneyjanecards/
Email: delaneyjanecards@gmail.com


Monday, June 17, 2019

A Shore thing and Day 3

Today, I had the opportunity to sneak a few minutes in of some crafty time. I am still working through the Pink and Main Crafty Courtyard card kit. I'm working on creating as many cards as possible with these kits to make them worth the cost because it is hard for me to justify the monthly fees for these kits if I can't make a bunch of cards with them. 


These are the three cards I'm choosing to share today. All different but all using this kit. I think being able to create entirely different feeling cards from one kit makes this one a real winner.


This seashell card was actually the last of the three that I made today. It was made up of extras. I had this panel die cut and these left over shells from the other shell card I made. The only thing I had to do was stamp and watercolor the sentiment strip and adhere everything together on a Tonic Studio honey gold panel. So pretty and delicate looking. I finished it off with some of the PnM rose gold gems. STUNNING!


The second card features this amazing light house. I masked the stamped image and ink blended the background panel with some stormy sky distress ink and a honey bee stamps stencil. I layered everything onto some heavy weight cardstock and adhered the panels to the card base. I cut my sentiment stamp (GASP!) so it fit on the wooden planks of the patterned paper, tied a piece of the brown twine to the panel and added a few knots for a nautical look.


A little glossy accents on the light of the light house finished this card. I adore the color combination of this kit and this card.


The final card for the day is something I never thought I'd create. I dry embossed the circle with the embossing folder that came in the kit, Darice's sunrays. I used some abandoned coral and squeezed lemonade distress ink. I masked off the circle with a piece of post it tape I cut a freehand wave pattern from and ink blended the water, broken china and chipped sapphire distress oxide.

I masked off the water and inked up the sand with antique linen distress oxide. I added some water splatters to the image and let them sit and picked the water up with  my towel. And I mounted the circle to a deep gray/ blue cardstock. I heat embossed the sentiment on the water in the little scene with white embossing powder.

I heat embossed the shells with gold embossing powder and water colored with zig clear color markers in pink flamingo and tea rose and blended the color out with the blender pen. I layered these shells on the edge of the circle.

I finished this card off with some spectrum noir sparkle pen, flat back gems, a gold Love from Lizi peel-off and some pattern papers from the paper pad. I popped the circle and shells up on foam mounting tape and tucked those gems in to add more sparkle.


Today was day three of the 30 day coloring challenge by the daily marker.